Indoor window sills serve two purposes - they help to properly heat your home, and can also be used as a practical shelf or decorative element. Read on and find out how to properly install an indoor window sill.
Indoor window sills serve two purposes – they help to properly heat your home, and can also be used as a practical shelf or decorative element. Read on and find out how to properly install an indoor window sill.
- When should you install indoor window sills?
- Installing a window sill above the radiator
- Wooden, conglomerate or plastic – which material should you choose?
- How far should the window sill overhang?
- How wide should the window sill be?
- Which window sill glue should you choose?
- How to install an indoor window sill?
- How to replace a window sill
When should you install indoor window sills?
Indoor window sills should be installed at the stage of wall finishing works. If you decide to install them before plastering the walls, remember to protect them appropriately, as they can easily be damaged. This is especially important in the case of wooden window sills, in which case it is recommended that you wait until the plastering is finished, so that the window sills are not exposed to moisture and dirt.
Indoor window sills are a good idea for several reasons. First of all they can complement your interior design and fulfil additional decorative purposes. For example, well-chosen indoor window sills will emphasise the design of your windows.
Indoor window sills are also worth installing for practical reasons- they give you additional space. For example they can double as shelves, on which you can place flower pots, photo frames or books.
The installation of indoor window sills can also lead to better circulation of warm air in living rooms. How is that?

Installing a window sill above the radiator
There are several ways to heat your home, such as floor heating or trench heaters. However, wall heaters are still very common, and are often installed near or directly under windows.
Installing an indoor window sill above the radiator will prevent warm air from flowing directly towards the ceiling. After encountering an obstacle in the form of a window sill, the heat will spread into the room.
In addition, the wall above the radiator will not get dirty from dust rising with the warm air. This is especially the case if you have cast iron radiators in your home.
To achieve the same effect, cast iron radiators need to be heated more strongly than more contemporary radiators. Newer models are more efficient and use cooler water, meaning less air movement and a lower risk of dust rising.
A window sill above the radiator will also help avoid water condensation on the window above, and therefore protect against moisture.


Wooden, conglomerate or plastic – which material should you choose?
Which indoor window sill should you choose? You should pay attention to more than just the physical design – your choice of window sill should depend on the type of room it will be installed in.
For example, window sills in bathrooms will tend to get wet from time to time, so it’s best to choose an indoor window sill that is water resistant The cheapest solution will be a window sill made from PVC, but you could also go for granite or marble.
However, stone window sills will be considerably more expensive. An alternative to natural stone could be window sills made from a conglomerate of ground quartz, marble or granite. They are as resistant as stone window sills, but at the same time much cheaper.
A conglomerate or stone window sill could be a good idea not only in the bathroom, but also in the kitchen. You can place a hot pot on it without worrying about causing any damage.
In the case of your living room or bedroom, the choice of material is not so important, so here the visual design will be key. Wooden or MDF window sills will optically make the interior feel warmer, and you can choose ones that match the colour of your window frames, doors or floor. In the living room, conglomerate or stone window sills will also look good. It all depends on the design you are going for.
How far should the window sill overhang?
This aspect is especially important if you want to install a window sill over a radiator, as it will have an impact on the air circulation.
Indoor window sills are best mounted at a distance of 10 to 20 cm above the radiator. Mounted at this height, they should completely cover the radiator or even stick out a few more centimetres.
However, if the indoor window sill is installed less than 10 cm from the radiator, it should not obscure it, as this would negatively affect the circulation of warm air. The room will not be as well heated, while the temperature will be borne by the window sill itself, which is not very undesirable if it is made from PCV.
A general assumption is that indoor window sills should not stick out from the wall more than 60% of their length. If, with functional or design reasons in mind, you want a window sill with a large surface that significantly sticks out, consider some form of additional support. This will ideally be attached beneath the sill, 50 cm apart from each other, or less. Attach them to the wall using wall plugs and screws, or to the window sill with building silicone.
How wide should the window sill be?
The width of the window sill largely depends on how much space you have and the intended use. If your expectations are more than just a design element, it could also be much wider than the window. However, as in the case of a window sill that sticks out from the wall, you should consider some form of additional support.
A standard assumption is that window sills are 3 to 5 cm wider than the window on each side. This is enough to firmly wedge the sill in the gaps in the wall.


Which window sill glue should you choose?
Choosing the right material can be crucial when installing indoor window sills. Which window sill glue is the best?
The most common and universal option is polyurethane adhesive, applied using a silicone gun. Polyurethane adhesive can be used with most window sills.
For marble window sills it is better to use transparent glue or mortar with white cement, as elements made of this material tend to discolour. Another method is low-expansion foam, used for installing window sills made of wood, PVC or conglomerate. It is not recommended for stone window sills.
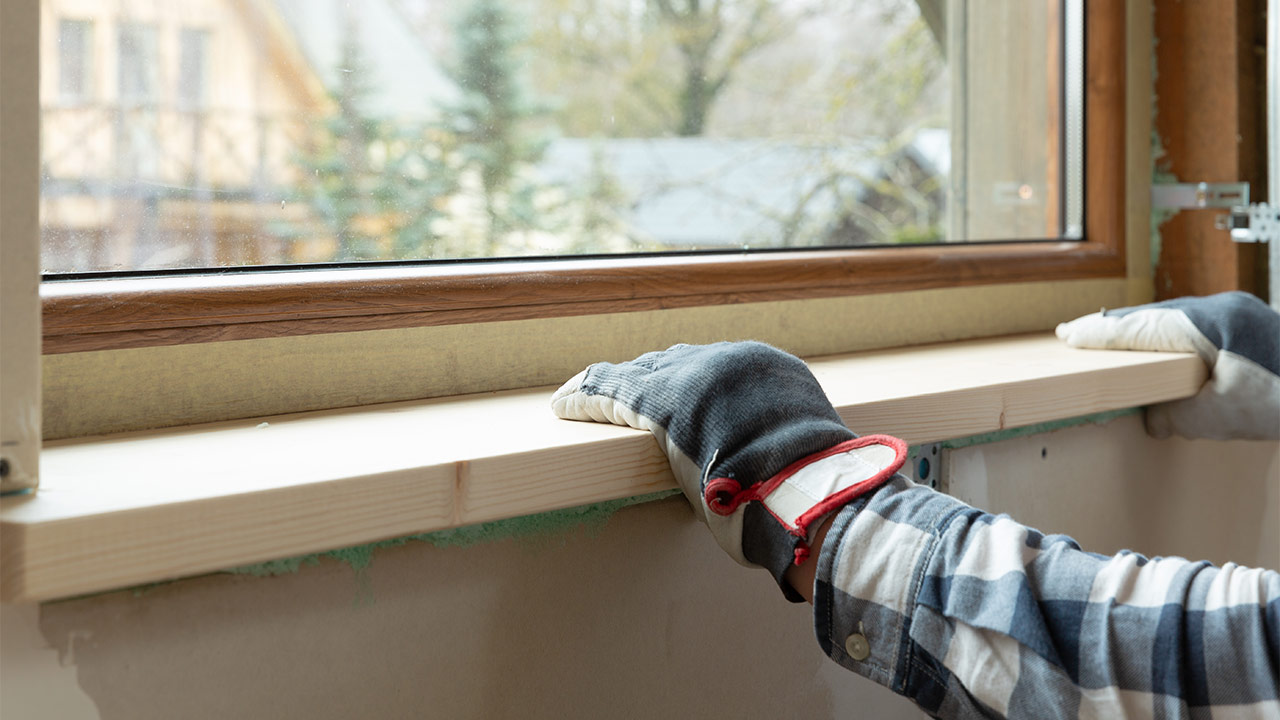
How to install an indoor window sill?
Start off by preparing the window recess. You will be setting the window sill in the wall, so check or prepare an appropriate recess.
The window sill should be at least 1-2 cm below the window frame. This distance will minimise heat loss. The window sill should not directly touch the frame, so if the space is too small, you will have to chip a hole in the wall.
However, if it is too large, you can reduce the gap using mortar. You will need an electric stirrer to prepare it. The layer should be even horizontally, but its surface may remain rough for better adhesion when gluing.
You may have to widen the recess on each side by 3 to 5 cm to wedge the window sill in the wall. An angle grinder can be used to do this. When the gaps are ready and the surface under the frame is even, clean the surface free of dust, varnish, paint and other residues that may affect the binding of the adhesive or foam. Before installing the window sill, make sure the wall is dry.
Also make sure the window sill fits properly before attempting to install it. Once sure, apply glue to the window sill and the wall. Slide the sill into place and block it with wedges. Use a spirit level to make sure it is properly levelled.
The window sill should either be installed at a right angle to the wall, or tilted slightly towards the room (about 2%). It is important that it declines into the room, not towards the window, so that moisture does not gather against the window itself.
After adjusting the position of the sill with wedges, you can put heavier items on it to evenly apply pressure to the whole surface. After the glue has dried, you can fill the gaps with silicone or low-pressure foam. Then cut off the excess with a knife, and finish off by filling in any remaining defects in the wall with putty.
How to replace a window sill
Window sills are one of the most characteristic elements of interior design. If you are planning a make-over of your home and the window sills do not match your interior design concept, or they are damaged or discoloured, then you might want to consider replacing them.
How should you do this? Start off by measuring the current window sills and deciding whether the new ones should be the same size or different. If they are to be the same, you could make a template out of cardboard. This will make it easier for a professional to cut the new indoor window sills to size.
Before you start replacing the window sill, properly secure the windows, floor and radiator, if there is one under the window. It’s better not to risk damaging the floor or glass with pieces of debris.
How do you replace a window sill? If it is only bolted to the wall with brackets, just unscrew them and remove the window sill. However, this element is usually attached directly to the wall and wedged in the window recess.
To remove the window sill, hit it from below with a rubber mallet. If you have managed to loosen it, then it should slide out of the mounting notches. However, if the window sill won’t budge after hitting it a few times, it may be necessary to carve a gap around the sill.
After doing so, hit the sill from the bottom again with a rubber mallet and check if it can now be removed. Once you have loosened the sill sufficiently, you can slide it out of the window recess. For this step you could do with a helping hand. Window sills can be very heavy, especially if made of stone.
The next steps of replacing the window sill are the same as in the case of installing a new one. But before you do so, you need to clean the window recess from debris and other dirt. If the new window sill is to be thinner or narrower than the current one, use levelling mortar.
See how to make a sun lounger out of pallets next!


Share