Building your own bed is not as difficult as it may seem. In fact it can even be fun. With a bit of imagination, perseverance, and of course if you follow the instructions in the guide below, you will not only be able to build your own bed, or even make your own headboards, but also be proud of the end result.
Building your own bed is not as difficult as it may seem. In fact it can even be fun. With a bit of imagination, perseverance, and of course if you follow the instructions in the guide below, you will not only be able to build your own bed, or even make your own headboards, but also be proud of the end result.
The necessary tools
First of all you need the right tools. Before starting any work, make sure you have everything you need. This includes:
- a saw or jigsaw
- a drill
- an electric screwdriver
- a grinder or sandpaper with different grit sizes (from 80 to 120)
- a paint brush or paint roller
- cloths or wipes
If you have any screw clamps lying around, then you can use them to press the glued parts together and enhance the stability of the bed frame. You could also twist the glued elements together.
What material will you need?
The material necessary for building your own bed depends on the chosen design. A bed with a basic, standard shape can be built in a few simple steps – you could even make your own bed frame from wooden euro-pallets. If you’re going for a more sophisticated concept, then your shopping list should include the following items:
- 4 wide pieces of square timber to be used as the bed legs
- 2 transverse slats, the width depending on that of the chosen mattress, usually between 90 and 200 cm + 2x the thickness of the longitudinal slats + gaps on each side of approx. 2 cm
- 2 side slats, the width depending on the chosen mattress, usually between 200 and 220 cm + gaps at each end of approx. 2 cm
- 3 to 5 crossbars (depending on the width of the bed) or 2 crossbars as support for the frame.
- 8 to 12 long screws and additional screws and nails for any later improvements
- Wood glue
- Linseed oil or varnish
The slats and square timber can be finished as required, in most good DIY stores. You should also find anything else you may need in the same stores. The total cost of all the material mentioned above should be in the range of £100 to £200 (depending on the type of wood and where you buy it).


Wood preparation and pre-treatment
Before starting work, the slats should be ideally smooth. You wouldn’t want to later rub your hands against a rough frame at night, or get splinters when you make your own bed. Each element should therefore be sanded down to a smooth finish using sandpaper or a grinder. We recommend the latter, as using sandpaper is rather time consuming. If you don’t want to buy a grinder just for this one job, then why not rent one. When sanding, always start off with the thickest paper with the smallest grain size. Start with 80, and then finish off with 120. If you want an exceptionally smooth surface, you could also use sandpaper with an even higher grit number.
Once you’ve done the corners and edges, it’s time to seal the wood. This is an absolutely vital step. Even if you don’t want a varnish finish, you can seal the wood with a thin cloth by applying linseed oil. Then put the wood aside to dry off and start cutting the legs.
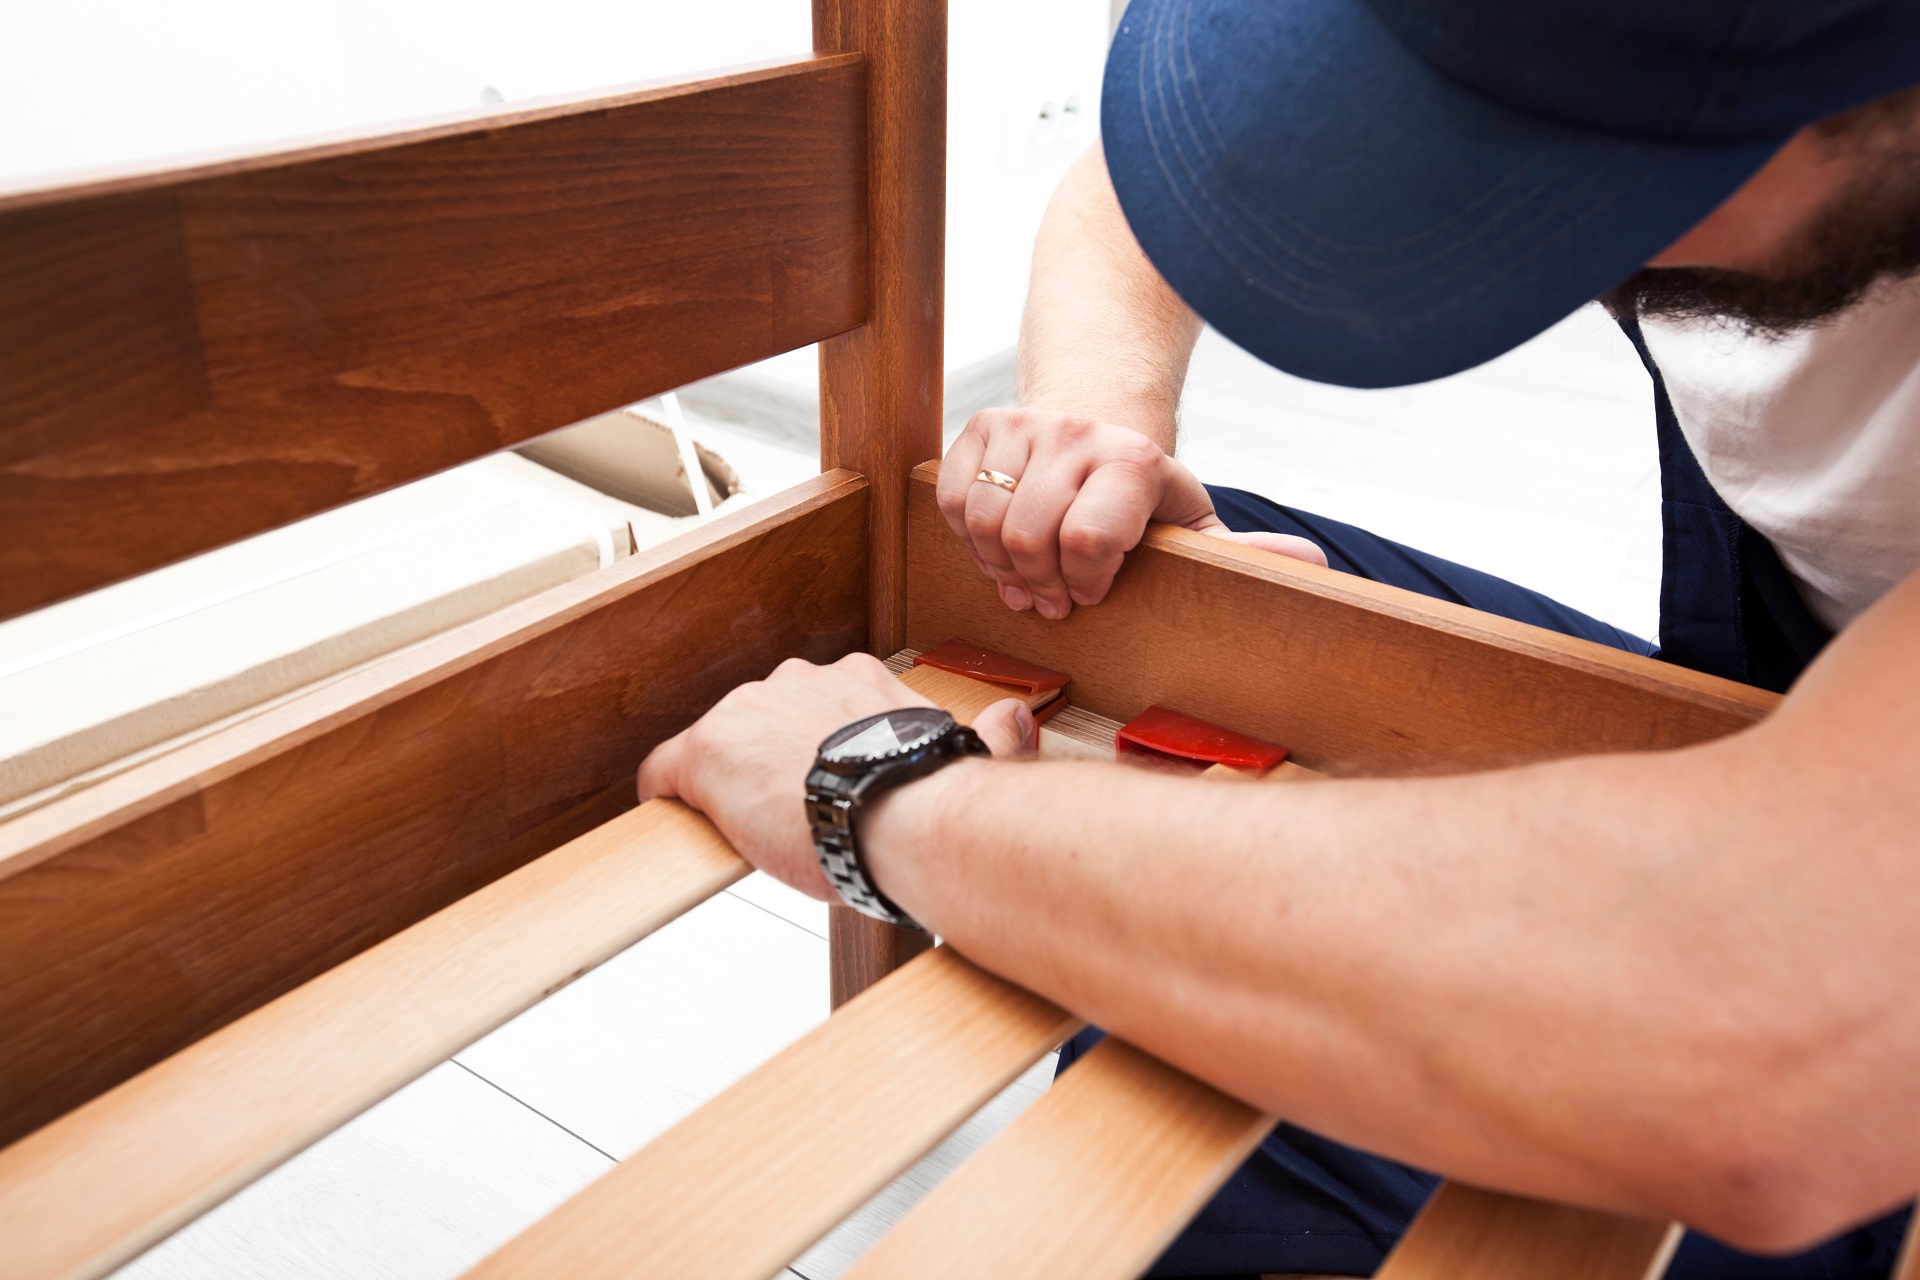
This is where it gets a bit more tricky, although nothing to worry about. Cuts should now be made in the bed legs, big enough to fit both ends of the longitudinal and transverse slaps. Mark the required depth with a pencil – it should be the same as the thickness of the slats (approx. 10 cm). Make sure you do this as precisely as possible, so that the slats slide smoothly into the cuts. A jigsaw will work best here.
Glue or screw everything together as necessary and voilà!
It’s now time to assemble the frame. Apply some wood glue into the cuts you made in the bed legs and insert the slats. Ideally you should connect the glued parts together with screw clamps and let the glue dry for about a day, but if you can’t or don’t want to wait that long, you could also screw the slats to the bed legs, after drilling holes in each slat to fit the screws. The slats should then be attached to the bed legs with long screws and an electric screwdriver. This will form the base for the bed frame. The most difficult part is now over!
Creating a base for the mattress
You have now managed to build your own bed frame, but the mattress still needs something to rest on. There are different options here, with the most common being transverse reinforcements or side rails, on which the frame rests on both sides. To do this follow these steps:
- A homemade bed with a slatted frame

Let’s look at the slatted frame option first. You need two slats that are a few centimetres shorter than the frame. They are then attached parallel to the long sides. We recommend that you use both wood glue and nails or screws.
Note: The nails or screws must be shorter than the sum of the widths of the slat and side panel. If the nails are longer, they may break through the side slats. To prevent this, check their length before you start work on this step. If they are longer than the elements joined together, then choose shorter ones.
If the slat has been nailed down, smaller screws should also be used at 5 or 10 cm intervals, to ensure the stability of the structure. If you decide to use screws instead of nails, the distance between the screws should be 10 to 15 cm.
- Sleep well thanks to cross slats
If you don’t have a slat frame and don’t want to buy one, you can simply use cross slats instead. They are much cheaper than a slat base, and although using transverse slats will not provide the same comfort as a slatted frame, if you like sleeping on hard mattresses then you will hardly notice the difference. Depending on the size and how stable you want it to be, glue and screw three to five transverse bars to the bed frame. Turn the bed “upside down” to attach the supports. This will let the mattress lie deeper than on the frame.
Regardless of which option you choose, your very own homemade bed is nearly ready.


Final touches
Before you sleep in your bed for the first time, you need to make some final touches. Brush the rough parts with a grinder once again and sand the wood. If you want to paint your bed in your favourite colours, then now is the time to do so. When it comes to the design, then your imagination is the limit. If you do decide to paint it, then now you need to let the paint dry. The drying time will be shown on the label of the paint you used. However, you should wait at least 24 hours before using the bed.
Our advice: If you think that you only need to paint the most visible parts of the bed, then think again. A common mistake is to forget about the corners. Sometimes you might also not notice or forget about small pieces of painter’s tape. It is best to paint all the parts at once and make sure that there are no bits left unpainted at the edges, which will later stand out.
Pimp my bed
Once the paint and glue have dried off, it’s time to put the mattress on the bed. From then on you can really let your imagination go wild, and create your own bed style with unusual bedding and as many fancy pillows and cushions as you want. But there are also many other ways to pimp your bed:
- Let there be light!
If you really want to spice up the appearance of your bed, why not fit the bottom edge of the bed with LED strips, and indirectly light up your bedroom with adjustable light sources. LED strips of various lengths and sizes start at around £20.
- Use the wall as a bed headboard!
Instead of a separate headboard, try painting the wall behind the bed in a different colour. By using different decoration styles, you can make your bed stand out from the wall behind it. There are many different styles of interior decoration – fancy colours, wall covers, drape-style curtains, and of course good-old classic wallpaper. Headrests are available from around £10 to £100. It all depends on which option you choose – paint, hand-made upholstery or elegant wallpaper.
- A romantic canopy over your bed
A canopy will always make it more romantic. Large and stylish canopies are available in many unique combinations. You can also mount a separate frame and attach an elegant mosquito net to it. Hanging the bedspread rail will be a piece of cake compared to building your own bed. Depending on the style and material, the cost should be between £20 and £200
- Built-in shelves to help you save space
Bed shelves are the perfect solution if you don’t want or don’t have space for a bedside cabinet, but still need somewhere to place things at night. Bed shelves are shaped like the letter “L” lying on its side. They can be easily placed between the frame and the mattress. Basic models are usually wooden or plastic, while the more expensive ones are often made of stainless steel or glass. They cost between £10 and £100.
- Enjoy the comfort of a soft pillow headboard
If you enjoy reading or working in bed, you should consider a soft pillow headboard. As the name suggests, this can then be used as a headrest. There are two types of such pillows. The first is a long wedge-shaped pillow that extends over the full width of the bed, and is available in many different sizes. However, make note that such pillows make the bed somewhat shorter, so tall people may want to consider other options. An alternative to the first solution is a hanging wall cushion. The only drawback of this solution is that the hanging rail must be attached to the pillow, which can make it less comfortable. The above proposals will cost you between £15 and £75.
Whichever option you choose, not only will you improve the design of your bed, but also hide any potential shortcomings that may occur during assembly. Your bed will become a perfectly designed and comfortable place to sleep.


Share